Troubleshooting
If you’re planning to update your Thinkific domain, you’ll need to contact Wobo support so we can do this for you.
Thinkific currently does not allow automatic updates so once you know what your new URL will be, please email us at: support@woboapp.com with the following information:
- The admin email address of your Wobo account
- Your current Thinkific domain URL
- Your new Thinkific domain URL
This change can take up to 48 hours to implement so please try to let us know in advance so that we can coordinate timing and your workbooks will remain accessible.
We’ll let you know once the change is complete. You can then proceed with updating each of the URLs in your Thinkific multimedia lessons.
You only need to update the domain section of the URL as in the screen below. Simply replace the old domain with your new domain, the rest of the URL does not need to be changed.
Your Thinkific domain and Wobo domain must match. If you’ve only updated your Thinkific domain your Wobo workbooks will not longer be accessible.
Thinkific currently does not let us update your Wobo domain automatically so if you’ve already made the change in Thinkific, please email us at: support@woboapp.com with the following information:
- The admin email address of your Wobo account
- Your current Thinkific domain URL
- Your new Thinkific domain URL
This change can take up to 48 hours to implement so please try to let us know in advance as early as possible so we can coordinate timing so workbooks remain accessible. We’ll let you know once the change is complete. You can then proceed with updating each of the URLs in your Thinkific multimedia lessons.
You only need to update the domain section of the URL as in the screen below. Simply replace the old domain with your new domain, the rest of the URL does not need to be changed.
There are a few limitations on who can install Thinkific apps:
- The email you use for Wobo and Thinkific must match in order to install the Thinkific app.
- In Thinkific, you must be a site admin in order to install apps.
- To keep your work but transfer your Wobo account to a Thinkific Site Admin, Under Settings > Profile, you can change your email. Once confirmed, try installing the Thinkific app again.
If your student updates their email for your Thinkific course, the next time they log in to Thinkific, a new workbook will be created for them. This means they will not have access to previous workbook responses. We are working on allowing students that change their emails to retain their work. Please reach out to the team at support@woboapp.com if this is an issue for you.
Follow these instructions to disconnect your Thinkific account from Wobo. You can do this if you’re no longer using Thinkific, or before connecting a different Thinkific domain to Wobo.
To uninstall the Wobo app:
- Log in to your Thinkific account.
- Go to “Apps” in the left menu.
- Find “Wobo” in the list, and click the uninstall button, represented by a red trash can button.
- Choose a reason for uninstalling, and click “Yes, Uninstall”.
- You’re done! If you uninstalled so that you could connect a different site, you can now connect a different Thinkific domain.
Re-installing the Wobo App with a new Thinkific Domain
To re-install the Wobo app, or install it again with a new Thinkific domain:
- In your Wobo account, click the user icon in the top toolbar and choose “Settings”
- Choose “Apps” in the left menu.
- Enter the Thinkific domain you want to connect in the input field and click “Install”.
- Log into your Thinkific account, and authorize the installation on the next screen.
Overview: Embedding in Thinkific
Overview: Installing the Thinkific App
Note that in Thinkific, you must have Site Admin privileges to install apps:
On this Page
- Troubleshooting
- Overview: Embedding in Thinkific
- Overview: Installing the Thinkific App
- On this Page
- What is Embedding?
- What does the Thinkific app do?
- How to Embed in Thinkific
- Step 1: Install the Wobo Thinkific App
- Step 2: Insert Module Embed Link in a Thinkific Lesson
- Add Wobo into a Multimedia Lesson:
- Add Wobo into a Text Area
- Overview: Embedding Wobo in a text area in Thinkific
- Code Snippet used in the above video:
- To add Wobo in a text area in Thinkific:
- Sending students to their dashboard
What is Embedding?
Embedding allows you to include external content within lessons so that you can display web pages like videos, surveys, and of course digital workbooks within the context of your course. In Thinkific, this is done using the Multimedia lesson type.
What does the Thinkific app do?
The Thinkific app enables your students to use their Thinkific credentials to seamlessly single sign-on into Wobo. As a course creator, it also automatically installs the site footer code snippet required to use Wobo within the course player, so fewer manual steps are required to get started.
This means:
- Students don't need to create a separate Wobo account since their Wobo account will be created using their Thinkific credentials.
- As a course creator, you don't need to invite students to your workbook by email, since they will enroll themselves by signing in through Thinkific.
- Students can work through exercises without leaving the Thinkific course player, minimizing distractions and improving engagement.
How to Embed in Thinkific
Step 1: Install the Wobo Thinkific App
- Enter the workbook builder by choosing Edit Workbook from the dashboard in Wobo.
- Find the module you want to include, and click the [⋮] menu on the right of the module name and a pop-up will appear.
- In the pop-up, choose Thinkific, and if you don't have the app installed yet, you'll be prompted to do that before continuing. Follow the steps on screen to complete the installation. If you already have the app installed, continue to Step 2.
Open the Copy Embed URL pop-up:
Link to install the Thinkific app:
Step 2: Insert Module Embed Link in a Thinkific Lesson
Add Wobo into a Multimedia Lesson:
- Once you've installed the Thinkific app using the instructions above, click the [⋮] menu beside the module you want to embed and you should now see a URL that you can copy.
Link to copy the embed URL:
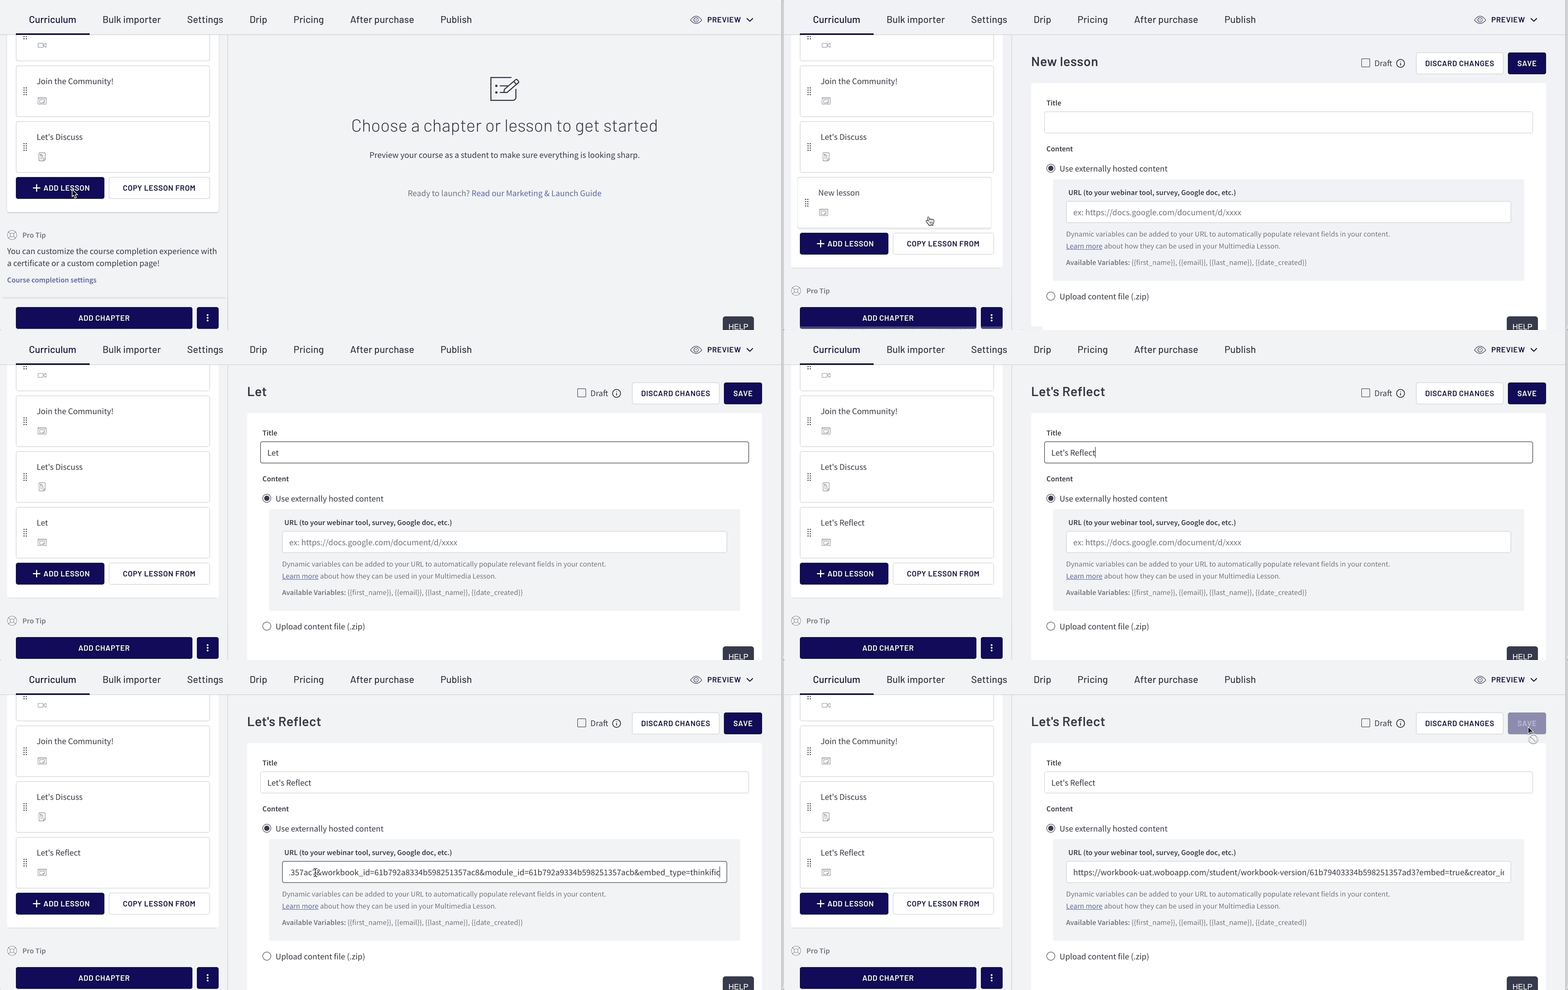
- In Thinkific, choose Add Lesson where you want the workbook module to appear, and then choose Multimedia Lesson.
- Ensure Use externally hosted content is selected, and then paste the URL you just copied into the field and save your changes in Thinkific.
Creating a multimedia lesson in Thinkific:
Add Wobo into a Text Area
Overview: Embedding Wobo in a text area in Thinkific
Code Snippet used in the above video:
To widen the embed window:
* Don’t forget this affects all courses!
<style>
.take .course-player__content-inner ._content_1yintd{
max-width: 100%;
}
</style>
To add Wobo in a text area in Thinkific:
- In Wobo, click the [⋮] menu beside the module you want to embed, and a window will open. Choose the iframe option in the embed window, like this:
- In Thinkific, choose the lesson type you’d like to add. In the lesson, click Add text and choose the Code View.
- Paste the code you just copied from Wobo:
- Note that in Thinkific, you need to switch out of Code View to save your changes.
Preview the lesson in Thinkific to view the workbook as your students will see it!
Sending students to their dashboard
Students can optionally view their workbook in a separate tab. This student dashboard is also where they can view their workbook after your course is complete.